For patients who are unable to achieve sufficient oral intake through food or oral nutritional supplements, or who cannot eat and drink safely, nasogastric tube feeding is often recommended. This method ensures proper nutrition and helps maintain the patient’s nutritional status.
Nasogastric tubes (NG tubes) are particularly beneficial for patients with dysphagia, as they often struggle to meet their nutritional needs despite dietary modifications and face a risk of aspiration.
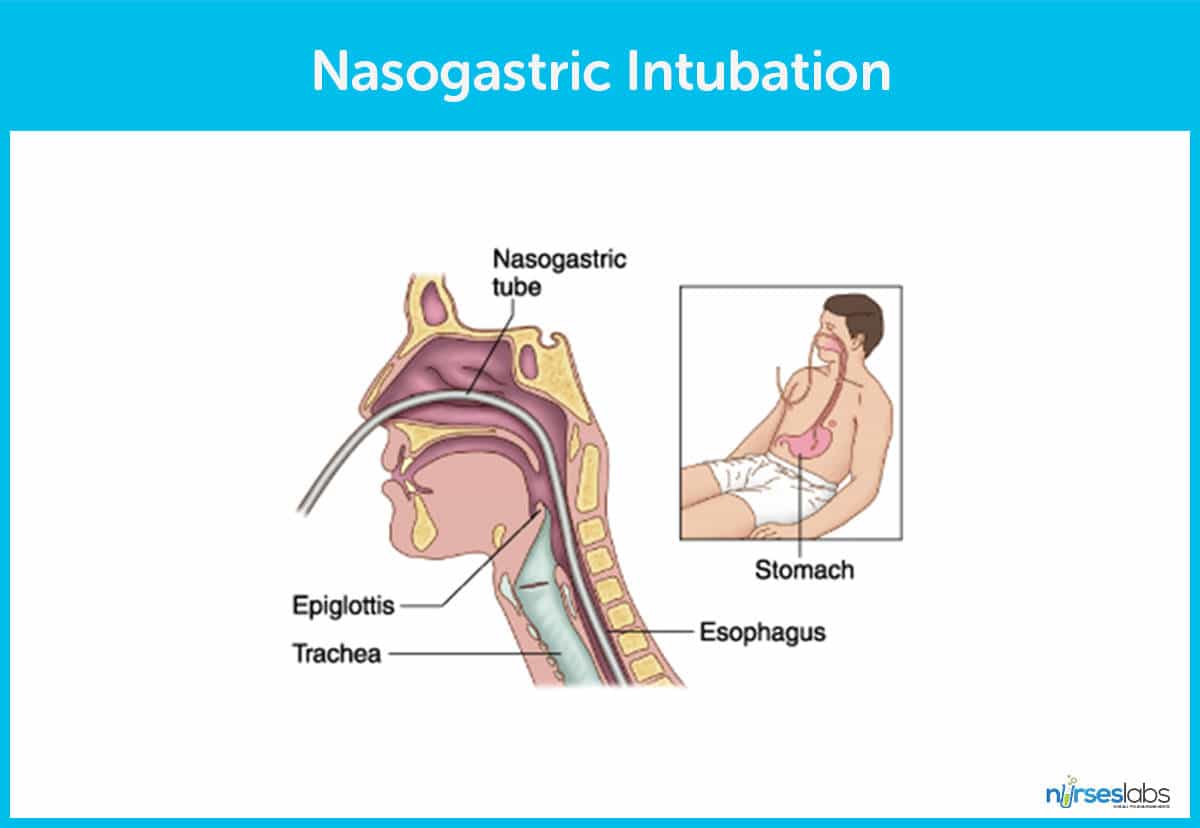
What is Nasogastric Intubation
Nasogastric (NG) intubation involves inserting a thin plastic tube through the nostril, down the esophagus, and into the stomach. Once in place, healthcare providers can use the NG tube to deliver food and medication directly to the stomach or to remove substances from it. This procedure is commonly used for patients who cannot eat or swallow. NG tubes are typically short and primarily used for suctioning stomach contents and secretions.
Types of Tubes
Tubes that pass from the nostrils into the duodenum or jejunum are called nasoenteric tubes. These tubes can be of medium length for feeding or long for decompression and aspiration.
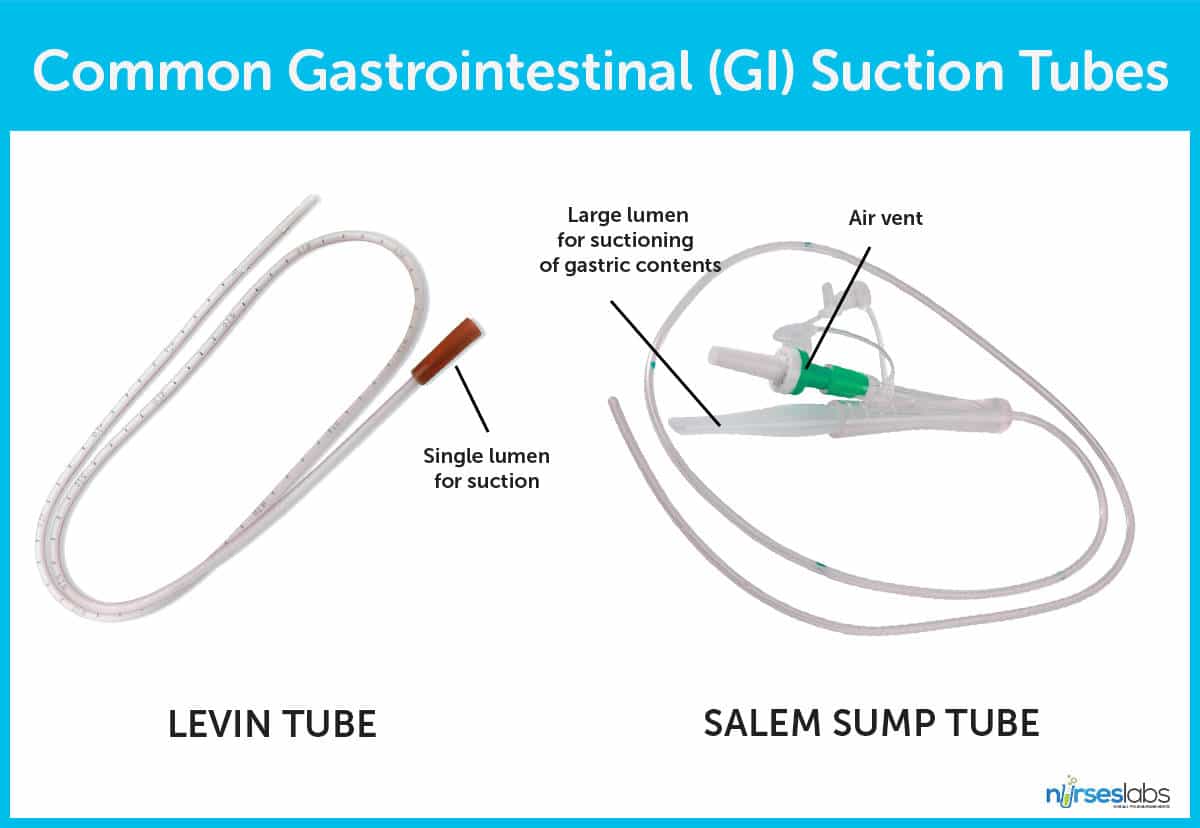
In GI intubation, the two most common types of tubes are:
- Levin tube: A single-lumen, multipurpose plastic tube commonly used for nasogastric intubation.
- Salem sump tube: A double-lumen tube with a “pigtail” used for intermittent or continuous suction.
Indications
By inserting a nasogastric tube, nurses can establish a direct connection to the stomach and its contents. The therapeutic indications for NG intubation include:
- Gastric Decompression. The NG tube is connected to suction to remove stomach contents, relieving pressure. This is essential for conditions such as bowel obstruction, paralytic ileus, and post-operative care for stomach or intestinal surgeries.
- Aspiration of Gastric Fluid. The NG tube allows for the aspiration of gastric fluid for lavage or specimen analysis. It is also used for drainage or lavage in cases of drug overdose or poisoning.
- Feeding and Medication Administration. The NG tube provides a passage into the GI tract, enabling enteral feeding and the administration of medications, particularly when oral intake is not possible.
- Prevention of Vomiting and Aspiration. In trauma settings, NG tubes help prevent vomiting and aspiration and are useful for assessing GI bleeding.
Contraindications
Nasogastric intubation is contraindicated in the following situations:
- Recent Nasal Surgery and Severe Midface Trauma. These are absolute contraindications due to the risk of intracranial tube insertion. In such cases, an orogastric tube may be used instead.
- Coagulation Abnormality. Patients with coagulation disorders are at increased risk of bleeding complications.
- Esophageal Varices. The presence of esophageal varices increases the risk of bleeding and other complications.
- Recent Banding of Esophageal Varices. Recent procedures on esophageal varices elevate the risk of damage and bleeding.
- Alkaline Ingestion. Ingestion of alkaline substances can cause significant esophageal and gastric damage, making NG intubation hazardous.
Risks and Complications
As with most procedures, NG tube insertion is not all beneficial to the patient as certain risks and complications are involved:
- Aspiration. The main complication of NG tube insertion include aspiration.
- Discomfort. A conscious patient may feel a little discomfort while the NG tube is passed through the nostril and into the stomach which can induce gagging or vomiting. A suction should always be present and ready to be used in this case.
- Trauma. The tube can injure the tissue inside the sinuses, throat, esophagus, or stomach if not properly inserted.
- Wrong placement. Unwanted scenarios such as the wrong placement of an NG tube into the lungs will allow food and medicine pass through it that may be fatal to the patient.
- Other complications include: abdominal cramping or swelling from feedings that are too large, diarrhea, regurgitation of the food or medicine, a tube obstruction or blockage, a tube perforation or tear, and tubes coming out of place and causing additional complications
- An NG tube is meant to be used only for a short period of time. Prolonged use can lead to conditions such as sinusitis, infections, and ulcerations on the tissue of your sinuses, throat, esophagus, or stomach.
Nursing Considerations
The following nursing considerations are crucial when managing a patient with a nasogastric tube:
- Provide Oral and Skin Care. Regularly offer mouth rinses and apply a water-soluble lubricant to the patient’s lips and nostrils to prevent dryness and irritation. Lubricate the catheter up to the point where it touches the nostrils.
- Verify NG Tube Placement. Always confirm that the NG tube is properly placed in the stomach by aspirating a small amount of stomach contents. An X-ray is the most reliable method for verifying tube placement.
- Wear Gloves. Always wear gloves when handling the NG tube to prevent contact with the patient’s blood or body fluids, especially important for inexperienced operators.
- Face and Eye Protection. Consider wearing face and eye protection if there is a high risk of vomiting. In trauma settings, all team members should wear gloves, face and eye protection, and gowns to adhere to protocol.
- Monitor for Complications. Be vigilant for signs of complications such as nasal irritation, tube displacement, or infection, and address them promptly.
- Patient Comfort. Ensure the patient is comfortable and educate them about the procedure and what to expect. Regularly check for any discomfort or issues with the tube.
- Document Care. Keep accurate records of tube placement verification, maintenance, and any complications or interventions performed.
Inserting a Nasogastric Tube
Learn the technique for inserting a nasogastric tube with this step-by-step procedure.
Supplies and Equipment
The following supplies are necessary for this procedure:
- Gloves
- Nasogastric tube
- Water-soluble lubricant (e.g., K-Y jelly)
- Protective towel covering for the client
- Emesis basin
- Tape for marking placement and securing the tube
- Glass of water (if allowed)
- Straw for the glass of water
- Stethoscope
- 60-mL catheter tip syringe
- Rubber band and safety pin
- Suction equipment or tube feeding equipment
Note: Aside from the primary operator, another person may be needed for insertion to assist the client with positioning, holding the glass of water (if allowed), and encouragement.
Preparation
Unlike the person performing the procedure, patients do not need extensive preparation for NG intubation or feeding. However, a patient may need to blow their nose and take a few sips of water (if allowed) before the procedure. Once the tube is inserted into the nostril, the patient may need to swallow or drink water to help ease the NG tube through the esophagus.
Anesthesia
In some institutions, topical anesthesia for nasogastric (NG) intubation is used to provide pain relief and increase the likelihood of successful tube insertion. Here are some more methods:
- Viscous Lidocaine (Sniff and Swallow Method): This method significantly reduces pain and the gagging sensation associated with NG tube insertion.
- Nebulization of Lidocaine (1% or 4%): Administered through a face mask.
- Anesthetic Spray: Benzocaine or a combination of tetracaine/benzocaine/butyl aminobenzoate can be used.
Steps in Inserting a Nasogastric Tube
Listed below are the step-by-step procedure in inserting a nasogastric tube.
1. Review the physician’s order and know the type, size, and purpose of the NG tube.
It is widely acceptable to use a size 16 or 18 French for adults while sizes suitable for children vary from a very small size 5 French for children to size 12 French for older children.
2. Check the client’s identification band.
Just like in administering medications, it is very important to be sure that the procedure is being carried out on the right client.
3. Gather equipment, set up tube-feeding equipment or suction equipment mentioned above.
This is to make sure that the equipment is functioning properly before using it on the client.
4. Briefly explain the procedure to the client and assess his capability to participate.
It is not advisable to explain the procedure too far in advance because the client’s anxiety about the procedure may interfere with its success. It is important that the client relax, swallow, and cooperate during the procedure.
5. Observe proper hand washing and don non-sterile gloves.
Clean, not sterile, technique is necessary because the gastrointestinal (GI) tract is not sterile.
6. Position client upright or in full Fowler’s position if possible.
Place a clean towel over the client’s chest. Full Fowler’s position assists the client to swallow, for optimal neck-stomach alignment and promotes peristalsis. A towel is used as a covering to protect bed linens and the client’s gown.
7. Measure tubing from bridge of nose to earlobe, then to the point halfway between the end of the sternum and the navel.
Mark this spot with a small piece of temporary tape or note the distance. Each client will have a slightly different terminal insertion point. Measurements must be made for each individual’s anatomy.
8. Wipe the client’s face and nose with a wet towel.
Wipe down the exterior of the nose with an alcohol swab. The NG tube will stay more secure if taped on a clean, non oily nose. If the nose has been cleaned with an alcohol swab, the tape will stay more secure and the tube will not move in the throat—causing gagging or discomfort later.
9. Cover the client’s eyes with a cloth.
This protects the client’s eyes from any alcohol fumes from the alcohol swab.
10. Examine nostrils for deformity or obstruction by closing one nostril and then the other and asking the client to breathe through the nose for each attempt.
If the client has difficulty breathing out of one nostril, try to insert the NG tube in that one. The client may breathe more comfortably if the “good” nostril remains patent.The blocked nasal passage may not be totally occluded and thus you may still be able to pass an NG tube. It may be necessary to use the more patent nostril for insertion.
11. Lubricate 4 to 8 inches of the tub with a water-soluble lubricant.
The NG intubation is very uncomfortable for many patients, so a squirt of Xylocaine jelly in the nostril, and a spray of Xylocaine to the back of the throat will help alleviate the discomfort.
12. Flex the client’s head forward, tilt the tip of the nose upward and pass the tube gently into the nose to as far as the back of the throat. Guide the tube straight back.
Flexing the head aids in the anatomic insertion of the tube.The tube is less likely to pass into the trachea.
13. Once the tube reaches the nasopharynx, allow the client lower his head slightly.
Ask the assistant to hold the glass of water. Ready the emesis basin and tissues. The positioning helps the passage of the NG to follow anatomic landmarks. Swallowing water, if allowed, helps the passage of the NG tube.
14. Instruct the client to swallow as the tube advances.
Advance the tube until the correct marked position on the tube is reached. Encourage the client to breathe through his mouth. Swallowing of small sips of water may enhance passage of tube into the stomach rather than the trachea.
15. If changes occur in patient’s respiratory status, if tube coils in mouth, if the patient begins to cough or turns cyanotic, withdraw the tube immediately.
The tube may be in the trachea and need to be withdrawn and repositioned.
16. If obstruction is felt, pull out the tube and try the other nostril.
The client’s nostril may deflect the NG into an inappropriate position. Let the client rest a moment and retry on the other side.
17. Advance the tube as far as the marked insertion point.
Place a temporary piece of tape across the nose and tube. In this way, you can check for placement before securing the tube. The tube may move out of position if not secured before checking for placement.
18. Check the back of the client’s throat to make sure that the tube is not curled in the back of the throat.
On instance, the NG will curl up in the back of the throat instead of passing down to the stomach. Visual inspection is needed in this situation. Withdraw the entire tube and start again if such thing occurred.
19. Check tube placement with these methods.
Check the tube for correct placement by at least two and preferably three of the following methods:
- Aspirate stomach contents.
Stomach aspirate will appear cloudy, green, tan, off-white, bloody, or brown. It is not always visually possible to distinguish between stomach and respiratory aspirates. Special note: The small diameters of some NG tubes make aspiration problematic. The tubes themselves collapse when suction is applied via the syringe. Thus, contents cannot be aspirated. - Check pH of aspirate.
Measuring the pH of stomach aspirate is considered more accurate than visual inspection. Stomach aspirate generally has a pH range of 0 to 4, commonly less than 4. The aspirate of respiratory contents is generally more alkaline, with a pH of 7 or more. - Inject 30 mL of air into the stomach and listen with the stethoscope for the “whoosh” of air into the stomach.
The small diameter of some NG tubes may make it difficult to hear air entering the stomach. - Confirm by x-ray placement.
X-ray visualization is the only method that is considered positive.
20. Secure the tube with tape or commercially prepared tube holder once stomach placement has been confirmed.
It is very important to ensure that the NG tube is in its correct place within the stomach because, if by accident the NG is within the trachea, serious complications in relation to the lungs would appear. Securing the tube in place will prevent peristaltic movement from advancing the tube or from the tube unintentionally being pulled out.
Administering Tube Feeding
Administering tube feeding ensures that patients who cannot consume food orally receive the necessary nutrients.
Supplies and Equipment
The following supplies are necessary for this procedure:
- Gloves
- Feeding pump (if ordered)
- Clamp (optional)
- Feeding solution
- Large catheter tip syringe (30 mL or larger)
- Feeding bag with tubing
- Water
- Measuring cup
- Other optional equipment (disposable pad, pH indicator strips, water-soluble lubricant, paper towels)
Steps in Tube Feeding
The following are the step in administering tube feeding via nasogastric tube.
1. Prepare the formula.
Follow the substeps below:
- Check the expiration date.
Outdated formulas may be contaminated or have reduced nutritional value. - Shake the can thoroughly.
Feeding solution may settle and mixing is necessary just before administration. - 1.3. For powdered formula, mix according to the instructions on the package. Prepare just enough for the next 24 hours and refrigerate unused formula. Allow the formula to reach room temperature before use.
Formula loses its nutritional value and can be contaminated if kept for more than 24 hours. Cold formulas can cause abdominal discomfort.
2. Explain the procedure to the client.
Providing the right information may result in the client’s cooperation and understanding.
3. Always check the position of the client. Make sure that the position of the client with a tube feeding remains with the head of bed elevated at least 30 to 40 degrees. Never feed the client with supine position.
Semi-Fowler’s or full-Fowler’s position prevents aspiration pneumonia and possible death due to pulmonary complications.
4. Check placement of feeding tube by:
4.1. Aspirating stomach contents. This indicates that the tube is in its proper place in the stomach. The amount of residual reflects gastric emptying time and indicates if feeding should proceed. This contents are returned to the stomach because they contain valuable electrolytes and digestive enzymes.
- Connect syringe to end of feeding tube.
- Pull back on plunger carefully.
- Determine amount of residual fluid (clamp tube if it is necessary to remove the syringe).
- Return residual to stomach via tube and continue with feeding if amount does not exceed agency protocol or physician’s orders.
4.2. Injecting 10 to 20 mL of air into tube (3–5 mL for children). A whooshing or gurgling sound usually indicates that the tube is in the stomach.This method may not be a reliable indicator with small-bore feeding tubes.
- Connect syringe filled with air to tube.
- Inject air while listening with stethoscope over left upper quadrant.
4.3. Measuring the pH of aspirated gastric secretions. Gastric contents are acidic, and a pH indicator strip should reflect a range of 1 to 4. Pleural fluid and intestinal fluid are slightly basic in nature.
4.4. Taking an x-ray or ultrasound. This may be needed to determine tube placement. X-ray visualization is the only method that is considered positive.
Intermittent or Bolus Feeding
5. If using a feeding bag:
- 5.1. Suspend the feeding bag about 12 to 18 inches inches above the stomach. Clamp the tubing. Fill the bag with prescribed formula and prime the tubing by opening the clamp, allowing the feeding to flow through the tubing. Clamp the tube.
Formula clears air from the tubing and prevents it from entering the stomach. - 5.2. Connect tip of the setup to the gastric tube and open the clamp. Adjust flow according to the physician’s order.
Feeding very quickly may cause nausea and abdominal cramping. - 5.3. As feeding is completed, add 30 to 60 mL of water to the feeding bag. Clamp the tube and disconnect the feeding setup.
This allows the tube to be cleared, keeping it patent. Clamping after feeding is completed prevents air from entering the stomach.
6. If using a syringe:
- 6.1. Clamp the gastric tube. Connect the tip of the large syringe, with the plunger or bulb removed, into the gastric tube. Gently pour feeding into the syringe. Raise the syringe 12 to 18 inches above the stomach. Open the clamp.
Gravity promotes movement of feeding into the stomach. - 6.2 Allow feeding solution to flow slowly into the stomach. Raise and lower the syringe to control the rate of flow. Add additional formula to the syringe as it empties until feeding is complete.
Controlling administration and flow rate of feeding solution prevents air from entering the stomach and nausea and abdominal cramping from developing.
Continuous Feeding
7. If using a feeding pump:
- 7.1 Clamp the feeding setup and suspend on pole. Add feeding solution to the bag. Open the clamp and prime the tubing.
Formula clears air from the tubing and prevents it from entering the stomach. Feeding pump. - 7.2 Thread the tubing through or load tubing into the pump, according to the manufacturer’s specifications.
- 7.3 Connect the tip of the setup to the gastric tube. Set the prescribed rate and volume according to the manufacturer’s directions. Open the clamp and turn on the pump.
Pump regulates the rate of administration and volume of formula. - 7.4. Stop the feeding every 4 to 8 hours and assess the residual. Flush the tube every 6 to 8 hours.
The amount of residual reflects gastric emptying time and indicates whether the feeding should continue. Flushing clears the tube and keeps it patent.
8. Stop feeding when completed. Instill prescribed amount of water. Keep the client’s head elevated for 20 to 30 minutes. Elevated position prevents the client from aspiration of feeding solution into the lungs.
9. Regularly assess the skin around the injection site of surgically placed tubes. Cleanse skin with mild soap and water and dry thoroughly. Check site for redness, swelling, pain, or additional signs of inflammation. Careful assessment and care can prevent spread infection and skin breakdown.
10. Always observe proper hygiene by providing mouth care such as brushing teeth, offering mouthwash, and keeping the lips moist. These activities promote oral hygiene and improve comfort.
Monitoring a Nasogastric Tube
Proper monitoring of a nasogastric tube is essential to ensure its correct placement and effective function. Here are the key objectives and charting requirements for monitoring an NG tube:
Steps in Monitoring a Nasogastric Tube
The following are the step-by-step procedures in monitoring a nasogastric tube:
1. Confirm physician’s order for NG tube, type of suction, and direction for irrigation.
Ensures correct implementation of physician’s order.
2. Observe drainage from NG tube. Check amount, color, consistency, and odor. Hematest drainage to confirm presence of blood in drainage.
Normal color of gastric drainage is light yellow to green in color due to the presence of bile. Bloody drainage may be expected after gastric surgery but must be monitored closely. Presence of coffee-ground type drainage may be indicate bleeding.
3. Inspect suction apparatus. Check that setting is correct for type of suction (continuous or intermittent), range of suction (low, medium, high) and that movement of drainage through tubing is present.
Ensures correct implementation of physician’ order. Ensures that suction is present and correctly adjusted. Loose connections or a kind or blockage in tube may interfere with suction.
4. Assess placement of NG tube.
NG tube may be displaced into trachea through movement or manipulation.
5. Assess comfort of client. Check for presence of nausea and vomiting, feeling of fullness, or pain.
May indicate incorrect operation of NG suction or blockage in tube.
6. Assess client’s abdomen for distention and auscultate for presence of bowel sounds.
Abdominal distention may be related to the accumulation of gas or internal bleeding. Presence of bowel sounds indicates the return of peristalsis.
7. Assess mobility of client and respiratory status.
Turning from side to side in bed and ambulation when permitted encourage the return of peristalsis and facilitate drainage. Presence of NG tube may discourage client from coughing and deep breathing necessary for adequate respiratory exchange.
8. Observe condition of client’s nostrils and oral cavity.
Nostrils need cleansing and lubrication with water-soluble lubricant and tape must be changed when necessary to minimize irritation from NG tube. Frequent mouth care (at 2-hr intervals) improves comfort and maintains moisture in oral mucosa.
9. Monitor overall safety of client with NG tube.
NG tube that is secured to client’s nose with tape and pinned to gown allows easier movement. Call bell within reach allows client ready access to nursing assistance. Any kinks or obstruction interferes with patency of NG tube. A semi-Fowler’s position facilitates drainage and minimizes any risk or aspiration.
10. Monitor NG tube and suction apparatus at least every 2 hours. Irrigate at interval ordered by physician.
Promotes safe operation of system. Any change in client’s condition or type of drainage necessitates more frequent observation and notification of physician.
11. Record and measure NG irrigations and drainage on intake/output chart according to schedule and agency protocol. Documents description of drainage and client’s response on chart.
Irrigations are recorded as intake. Drainage from NG tube is measured as output every 8 hour. If drainage is copious, more frequent emptying of collection container will be necessary. Documentation provides accurate record of client’s response to NG drainage.
12. Replenish supplies and maintain equipment according to agency policy and manufacturer’s recommendations.
Ensures availability of necessary supplies. Provides for safe operation of equipment and efficient drainage of client’s gastric contents.
Irrigating a Nasogastric Tube
Regular irrigation of a nasogastric tube is crucial to maintain its patency and ensure proper functioning. This procedure helps clear any formula or debris inside the tube, especially when stomach contents fail to flow through it. While some tubes require irrigation with normal saline solution, others are maintained by airflow. For double-lumen tubes, it is important to connect the main lumen to suction and use the short lumen as an airway. If the main lumen becomes blocked, clearing it first and then injecting air through the short lumen can help restore proper function.
Supplies and Equipment
The following supplies and equipment are necessary for this procedure:
- Nasogastric tube connected to continuous or intermittent suction.
- Irrigation or Toomey syringe and container for irrigating solution.
- Normal saline for irrigation.
- Disposable pad or bath towel
- Disposable gloves (optional)
- Stethoscope
- Clamp
Steps in Irrigating Nasogastric Tubes
The following is the step-by-step procedure in irrigating nasogastric tubes:
1. Check physician’s order for irrigation. Explain procedure to client.
Clarifies schedule and irrigating solution. An explanation encourages client cooperation and reduces apprehension.
2. Gather necessary equipment. Check expiration dates on irrigating saline and irrigation set.
Provides for organized approached to task. Agency policy dictates safe interval for reuse of equipment.
3. Wash your hands.
Handwashing deters the spread of microorganisms.
4. Assist client to semi-Fowler’s position unless this is contraindicated.
Minimizes risk of aspiration.
5. Check placement of NG tube using the following techniques:
- A. Attach Asepto or Toomey syringe to the end of tube and aspirate gastric contents.
The tube is in the stomach if its contents can be aspirated. - B. Place 10mL-50ml of air in syringe and inject into the tube. Simultaneously, auscultate over the epigastric area with a stethoscope.
A whooshing sound can be heard when the air enters the stomach through the tube. - C. Ask client to speak.
If tube is misplaced in trachea, the client may have difficulty speaking.
6. Clamp suction tubing near connection site. Disconnect NG tube from suction apparatus and lay on disposable pad or towel.
Protects client from leakage of NG drainage.
7. Pour irrigating solution into container. Draw up 30 ml of saline (or amount ordered by physician) into syringe.
Delivers measured amount of irrigating solution through NG tube. Saline compensates for electrolytes lost through NG drainage.
8. Place tip of syringe in NG tube. Hold syringe upright and gently insert the irrigating solution (or allow solution to flow in by gravity if agency or physician indicates). Do not force solution into NG tube.
Position of syringe prevents entry of air into stomach. Gentle insertion of saline (or gravity insertion) is less traumatic to gastric mucosa.
9. If unable to irrigate tube, reposition client and attempt irrigation again. Check with physician if repeated attempts to irrigate tube fail.
Tube may be positioned against gastric mucosa making it difficult to irrigate.
10. Withdraw or aspirate fluid into syringe. If no return, inject 20 ml of air and aspirate again.
Injection of air may reposition the end of tube.
11. Reconnect NG tube to suction. Observe movement of solution or drainage.
Determine patency of NG tube and correct operation of suction apparatus.
12. Measure and record amount and description of irrigating solution and return solution.
Irrigating solution placed in NG tube is considered intake: solution returned is recorded as output.
13. Rinse equipment if it will be reused.
Promotes cleanliness and prepares equipment for next irrigation.
14. Wash your hands.
Handwashing deters the spread of microorganisms.
15. Record irrigation procedure, description of drainage and client’s response.
Facilitates documentation of procedure and provides for comprehensive care.
Removing a Nasogastric Tube
Removing a nasogastric tube is a significant step in patient care and is performed to assess whether the patient can tolerate oral feeding. This procedure involves specific objectives and considerations to ensure patient safety and comfort.
The primary objective of removing a nasogastric tube is to determine if the patient can handle oral feeding without complications. Before proceeding, it is important to identify any contraindications. One key contraindication is the continuing need for the tube, either for feeding or suction. If the patient still requires these supports, the tube should not be removed.
Supplies and Equipment
These equipment are necessary:
- Tissues
- Plastic disposable bag
- Bath towel or disposable pad
- Clean disposable glove
Steps in Removing Nasogastric Tube
The following is the step-by-step procedure in removing nasogastric tubes:
1. Check physician’s order for removal of nasogastric tube.
Ensures correct implementation of physician’s order.
2. Explain procedure to client.
Explanation facilitates client cooperation and understanding.
3. Gather equipment.
Makes every step within reach and provides for organized approach to task.
4. Wash your hands. Don clean disposable glove on hand that will remove tube.
Handwashing deters the spread of microorganisms. Gloves protect hand from contact with abdominal secretions.
5. Discontinue suction and separate tube from suction. Unpin tube from client’s gown and carefully remove adhesive tape from bridge of nose.
Allows for unrestricted removal of nasogastric tube.
6. Place towel or disposable pad across client’s chest. Hand tissues to client.
Protects client from contact with gastric secretions. Tissues are necessary if client wishes to blow his nose when tube is removed.
7. Instruct client to take a deep breath and hold it.
Prevents accidental aspiration of any gastric secretions in tube.
8. Clamp tube with fingers. Quickly and carefully remove tube while client holds his breath.
Minimizes trauma and discomfort for client. Clamping prevents any drainage of gastric contents in tube.
9. Place tube in disposable plastic bag. Remove glove and place in bag.
Prevents contamination with any microorganisms.
10. Reposition client and offer mouth care to client and make client feel comfortable.
Position the patient comfortably, either in their preferred position or in a position that promotes recovery and comfort. Ensure the bed is adjusted appropriately, and provide pillows or supports as needed.
11. Measure nasogastric drainage. Remove all equipment and dispose according to agency policy. Wash your hands.
Measuring nasogastric drainage provides for accurate recording of output. Proper disposal deters spread of microorganisms.
12. Record removal of nasogastric tube, client’s response, and measurement of drainage.
Facilitates documentation and provides for comprehensive care. Continue to monitor the patient for any signs of discomfort or complications following the removal of the tube. Educate the patient on what to expect and when to seek help if they experience any unusual symptoms.


Leave a Comment