In this guide for patient positioning, learn about the common bed positions such as Fowler’s, dorsal recumbent, supine, prone, lateral, lithotomy, Sims’, Trendelenburg’s, and other surgical positions commonly used. Learn about the different patient positioning guidelines, how to properly position the patient, and the nursing considerations and interventions you need to know.
What is Patient Positioning?
Patient positioning involves properly maintaining a patient’s neutral body alignment by preventing hyperextension and extreme lateral rotation to prevent complications of immobility and injury. Positioning patients is an essential aspect of nursing practice and a responsibility of the registered nurse. In surgery, specimen collection, or other treatments, proper patient positioning provides optimal exposure to the surgical/treatment site and maintenance of the patient’s dignity by controlling unnecessary exposure. In most settings, proper positioning of patients provides airway management and ventilation, maintains body alignment, and provides physiologic safety.
Goals of Patient Positioning
The ultimate goal of proper patient positioning is to safeguard the patient from immobility injury and physiological complications. Specifically, patient positioning goals include:
- Provide patient comfort and safety. Support the patient’s airway and maintain circulation throughout the procedure (e.g., surgery, examination, specimen collection, and treatment). Impaired venous return to the heart and ventilation-to-perfusion mismatching are common complications. Proper positioning promotes comfort by preventing nerve damage and by preventing unnecessary extension or rotation of the body.
- Maintaining patient dignity and privacy. In surgery, proper positioning is a way to respect the patient’s dignity by minimizing exposure of the patient, who often feels vulnerable perioperatively.
- Allows maximum visibility and access. Proper positioning allows ease of surgical access as well as for anesthetic administration during the perioperative phase.
Guidelines for Patient Positioning
Proper execution is needed during patient positioning to prevent injury for both the patient and the nurse. Remember these principles and guidelines when positioning clients:
- Explain the procedure. Explain to the client why their position is being changed and how it will be done. Rapport with the patient will make them more likely to maintain the new position.
- Encourage the client to assist as much as possible. Determine if the client can fully or partially assist. Clients that can assist will save strain on the nurse. It will also be a form of exercise, increasing the client’s independence and self-esteem.
- Get adequate help. When planning to move or reposition the client, ask for help from other caregivers. Positioning may not be a one-person task.
- Use mechanical aids. Bed boards, slide boards, pillows, patient lifts, and slings can facilitate the ease of changing positions.
- Raise the client’s bed. Adjust or reposition the client’s bed so that the weight is at the nurse’s center of gravity level.
- Frequent position changes. Note that any correct or incorrect position can be detrimental to the patient if maintained for a long time. Repositioning the patient every two hours helps prevent complications like pressure ulcers and skin breakdown.
- Avoid friction and shearing. When moving patients, lift rather than slide to prevent friction that can abrade the skin making it more prone to skin breakdown.
- Proper body mechanics. Observe good body mechanics for your and your patient’s safety.
- Position yourself close to the client.
- Avoid twisting your back, neck, and pelvis by keeping them aligned.
- Flex your knees and keep your feet wide apart.
- Use your arms and legs and not your back.
- Tighten abdominal muscles and gluteal muscles in preparation for the move.
- A person with the heaviest load coordinates the efforts of the nurse and initiates the count to 3.
Common Patient Positions
The following are the commonly used patient positions, including a description of how they are performed and the rationale:
Supine or Dorsal Recumbent Position
Supine position, or dorsal recumbent, is wherein the patient lies flat on the back with head and shoulders slightly elevated using a pillow unless contraindicated (e.g., spinal anesthesia, spinal surgery).
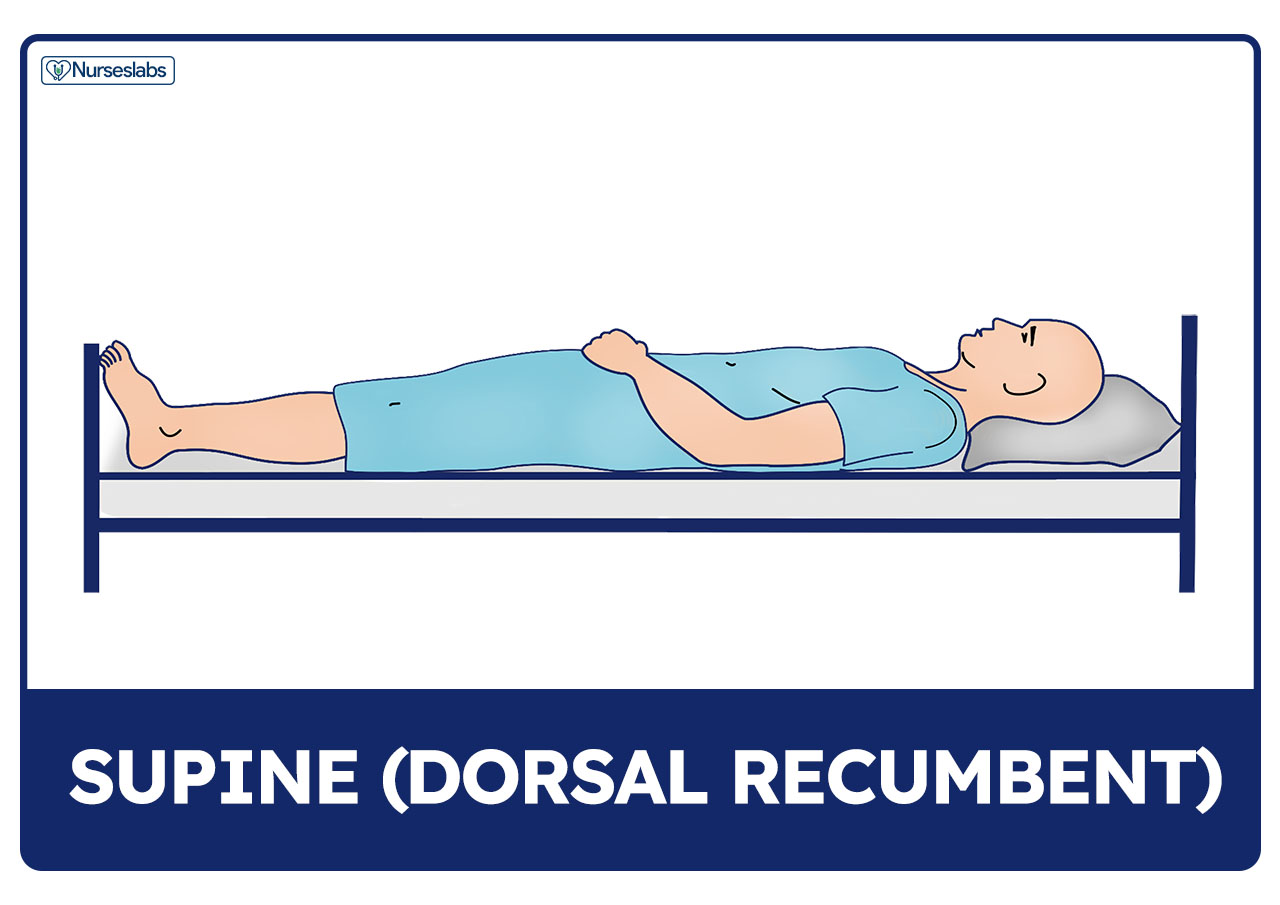
- Variation in position. In supine position, legs may be extended or slightly bent with arms up or down. It provides comfort in general for patients under recovery after some type of surgery.
- Most commonly used position. Supine or dorsal recumbent is used for general examination or physical assessment.
- Watch out for skin breakdown. Supine position may put patients at risk for pressure ulcers and nerve damage. Assess for skin breakdown and pad bony prominences.
- Support for supine position. Small pillows may be placed under the head to lumbar curvature. Heels must be protected from pressure by using a pillow or ankle roll. Prevent prolonged plantar flexion and stretch injury of the feet by placing a padded footboard.
- Supine position in surgery. Supine is frequently used on procedures involving the anterior surface of the body (e.g., abdominal area, cardiac, thoracic area). A small pillow or donut should be used to stabilize the head, as an extreme rotation of the head during surgery can lead to occlusion of the vertebral artery.
Fowler’s Position
Fowler’s position, also known as semi-sitting position, is a bed position wherein the head of the bed is elevated 45 to 60 degrees. Variations of Fowler’s position include low Fowler’s (15 to 30 degrees), semi-Fowler’s (30 to 45 degrees), and high Fowler’s (nearly vertical).
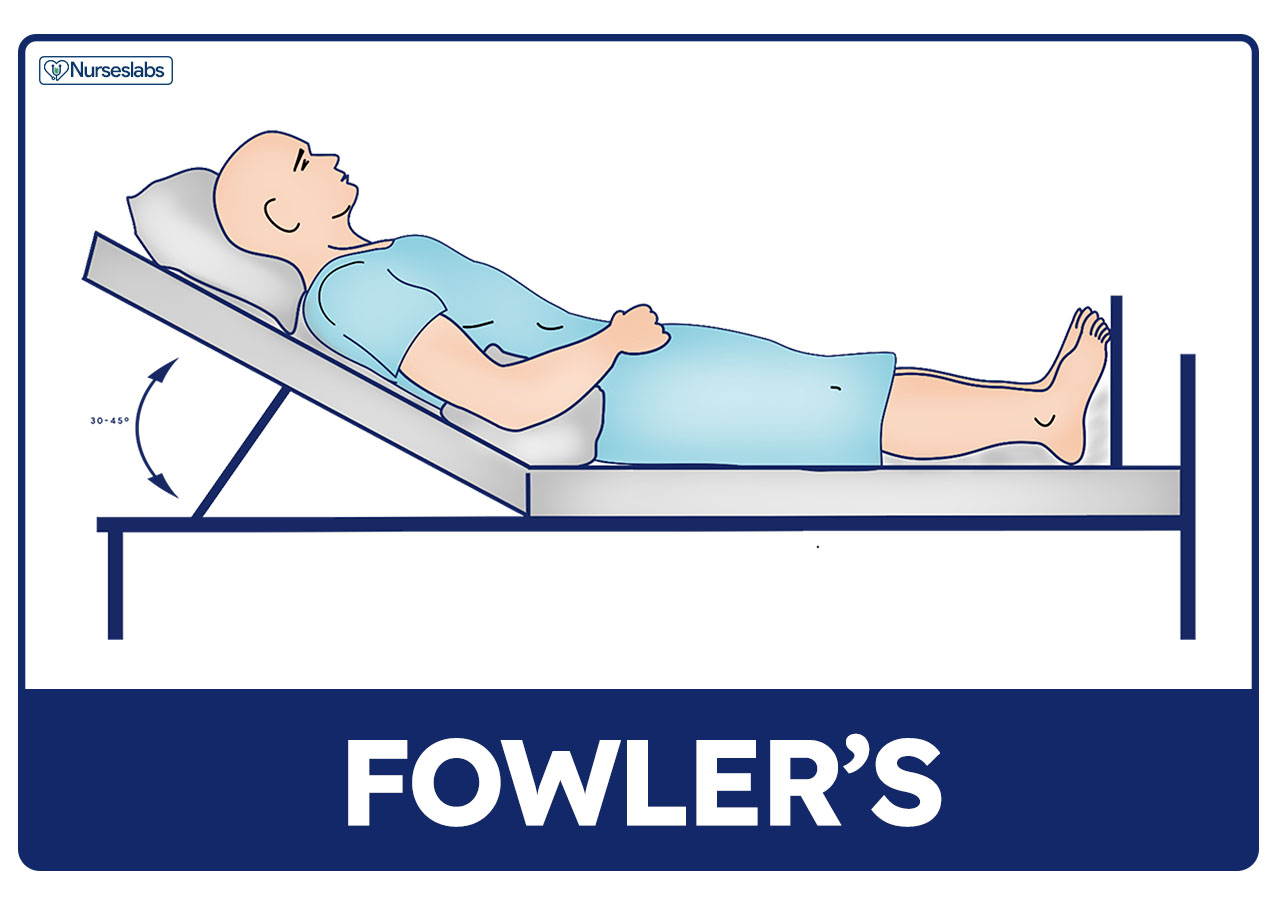
- Promotes lung expansion. Fowler’s position is used for patients who have difficulty breathing because, in this position, gravity pulls the diaphragm downward, allowing greater chest and lung expansion.
- Useful for NGT. Fowler’s position is useful for patients with cardiac, respiratory, or neurological problems and is often optimal for patients with a nasogastric tube.
- Prepare for walking. Fowler’s is also used to prepare the patient for dangling or walking. Nurses should watch out for dizziness or faintness during a change of position.
- Poor neck alignment. Placing an overly large pillow behind the patient’s head may promote the development of neck flexion contractures. Encourage the patient to rest without pillows for a few hours each day to extend the neck fully.
- Used in some surgeries. Fowler’s position is usually used in surgeries that involve neurosurgery or the shoulders
- Use a footboard. Using a footboard is recommended to keep the patient’s feet in proper alignment and to help prevent foot drops.
- Etymology. Fowler’s position is named after George Ryerson Fowler, who saw it as a way to decrease the mortality of peritonitis.
Orthopneic or Tripod Position
Orthopneic or tripod position places the patient in a sitting position or on the side of the bed with an overbed table in front to lean on and several pillows on the table to rest on.
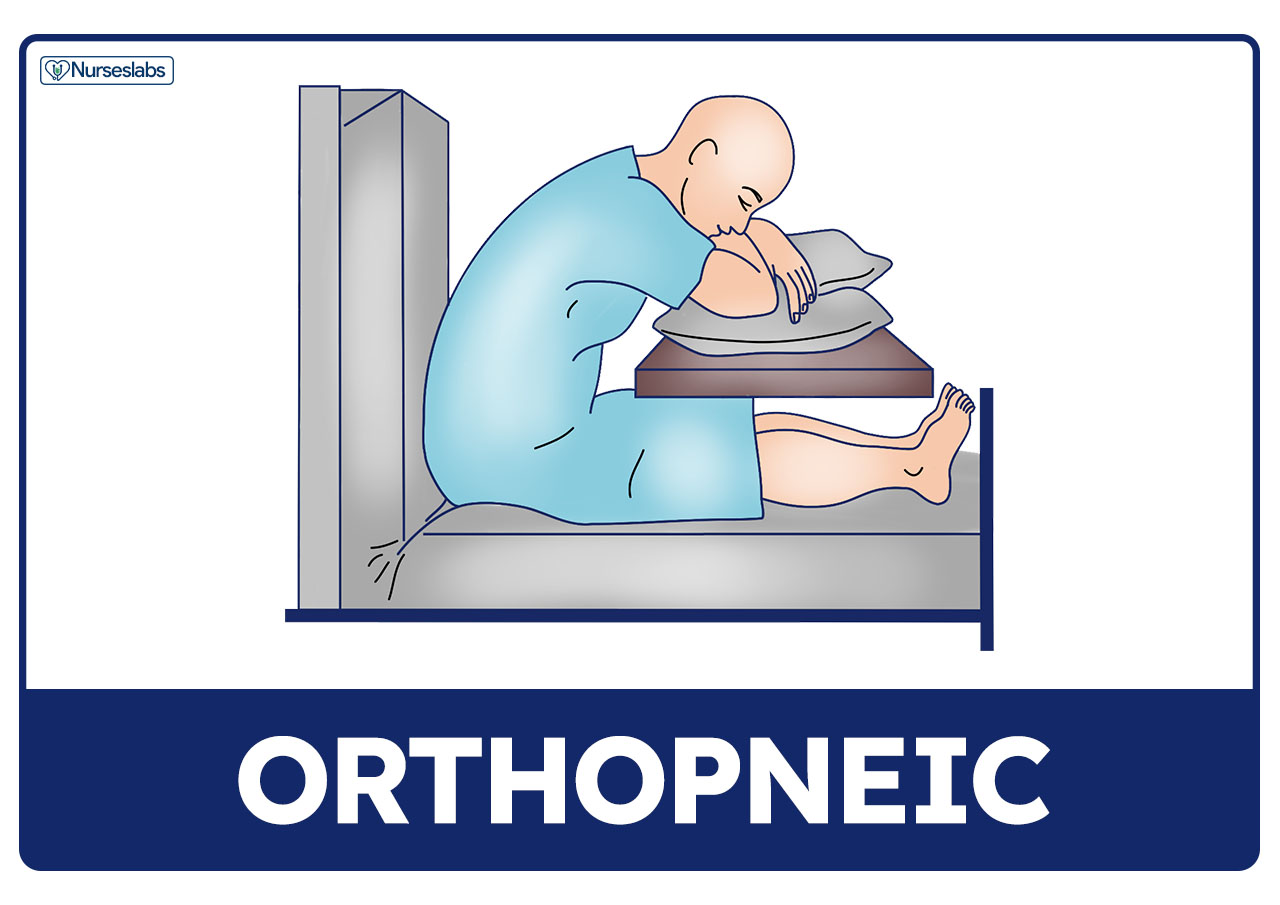
- Maximum lung expansion. Patients with difficulty of breathing are often placed in this position because it allows maximum chest expansion.
- Helps in exhaling. Orthopneic position is particularly helpful to patients who have problems exhaling because they can press the lower part of the chest against the edge of the overbed table.
Prone Position
In prone position, the patient lies on the abdomen with their head turned to one side and the hips are not flexed.
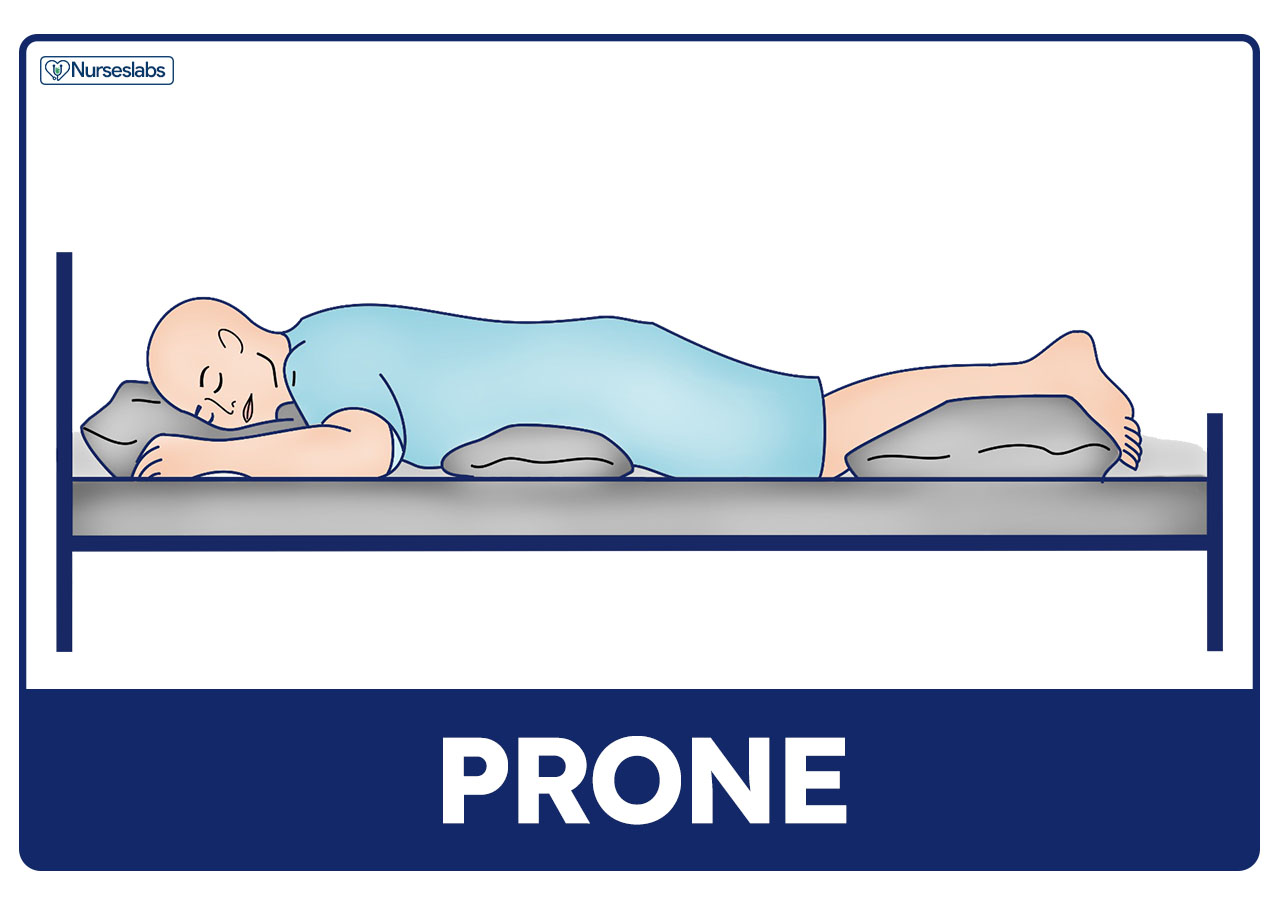
- Extension of hips and knee joints. Prone position is the only bed position that allows full extension of the hip and knee joints. It also helps to prevent flexion contractures of the hips and knees.
- Contraindicated for spine problems. The pull of gravity on the trunk when the patient lies prone produces marked lordosis or forward curvature of the spine, thus contraindicated for patients with spinal problems. Prone position should only be used when the client’s back is correctly aligned.
- Drainage of secretions. Prone position also promotes drainage from the mouth and is useful for unconscious clients or those recovering from surgery on the mouth or throat.
- Placing support in prone. To support a patient lying in prone, place a pillow under the head and a small pillow or a towel roll under the abdomen.
- In surgery. Prone position is often used for neurosurgery in most neck and spine surgeries.
Lateral Position
In lateral or side-lying position, the patient lies on one side of the body with the top leg in front of the bottom leg and the hip and knee flexed. Flexing the top hip and knee and placing this leg in front of the body creates a wider, triangular base of support and achieves greater stability. An increase in flexion of the top hip and knee provides greater stability and balance. This flexion reduces lordosis and promotes good back alignment.
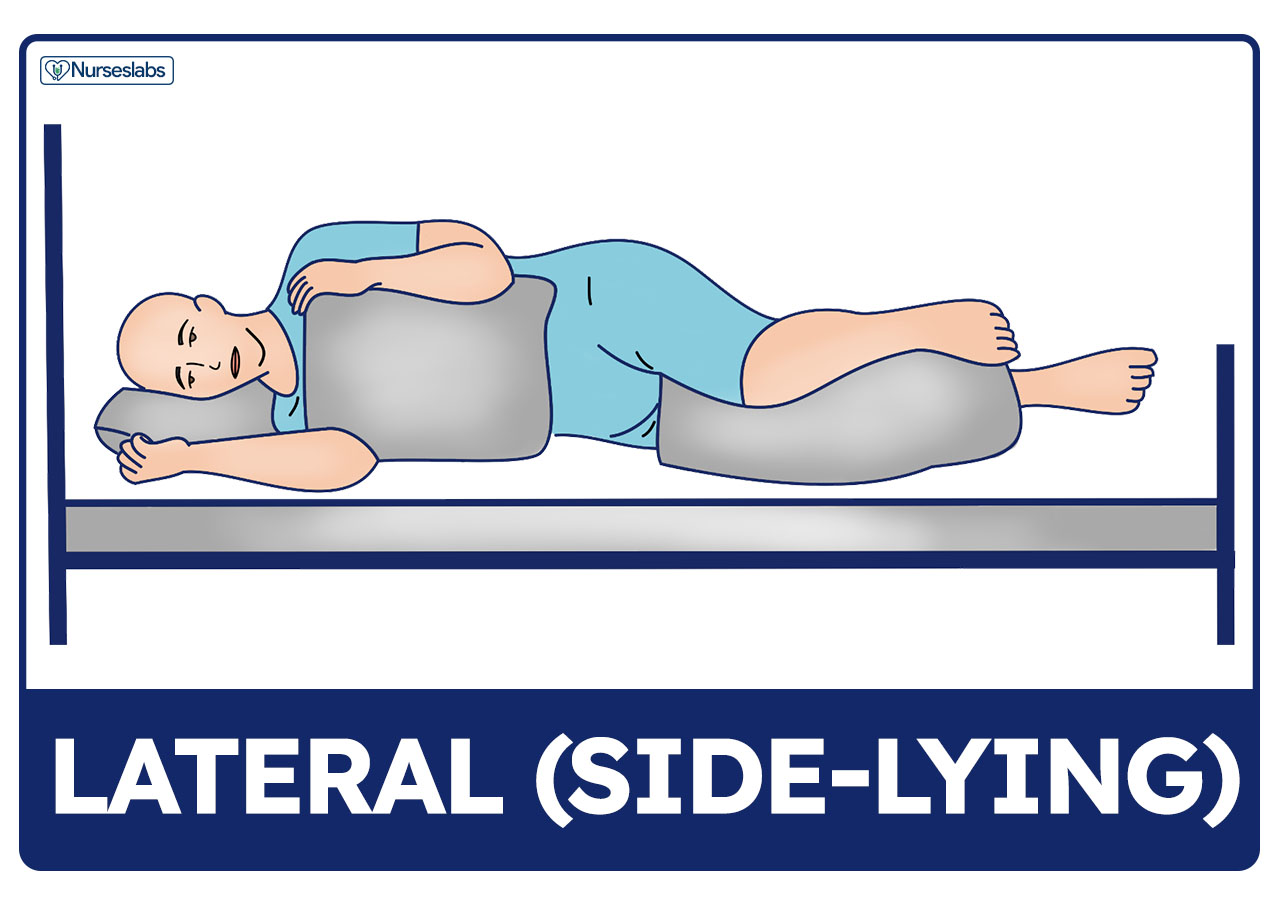
- Relieves pressure on the sacrum and heels. Lateral position helps relieve pressure on the sacrum and heels, especially for people who sit or are confined to bed rest in supine or Fowler’s position.
- Body weight distribution. In this position, most of the body weight is distributed to the lateral aspect of the lower scapula, the lateral aspect of the ilium, and the greater trochanter of the femur.
- Support pillows needed. To correctly and comfortably position the patient in lateral position, support pillows are needed.
Sims’ Position
Sims’ position or semi-prone position is when the patient assumes a posture halfway between the lateral and the prone positions. The lower arm is positioned behind the client, and the upper arm is flexed at the shoulder and the elbow. The upper leg is more acutely flexed at both the hip and the knee than is the lower one.
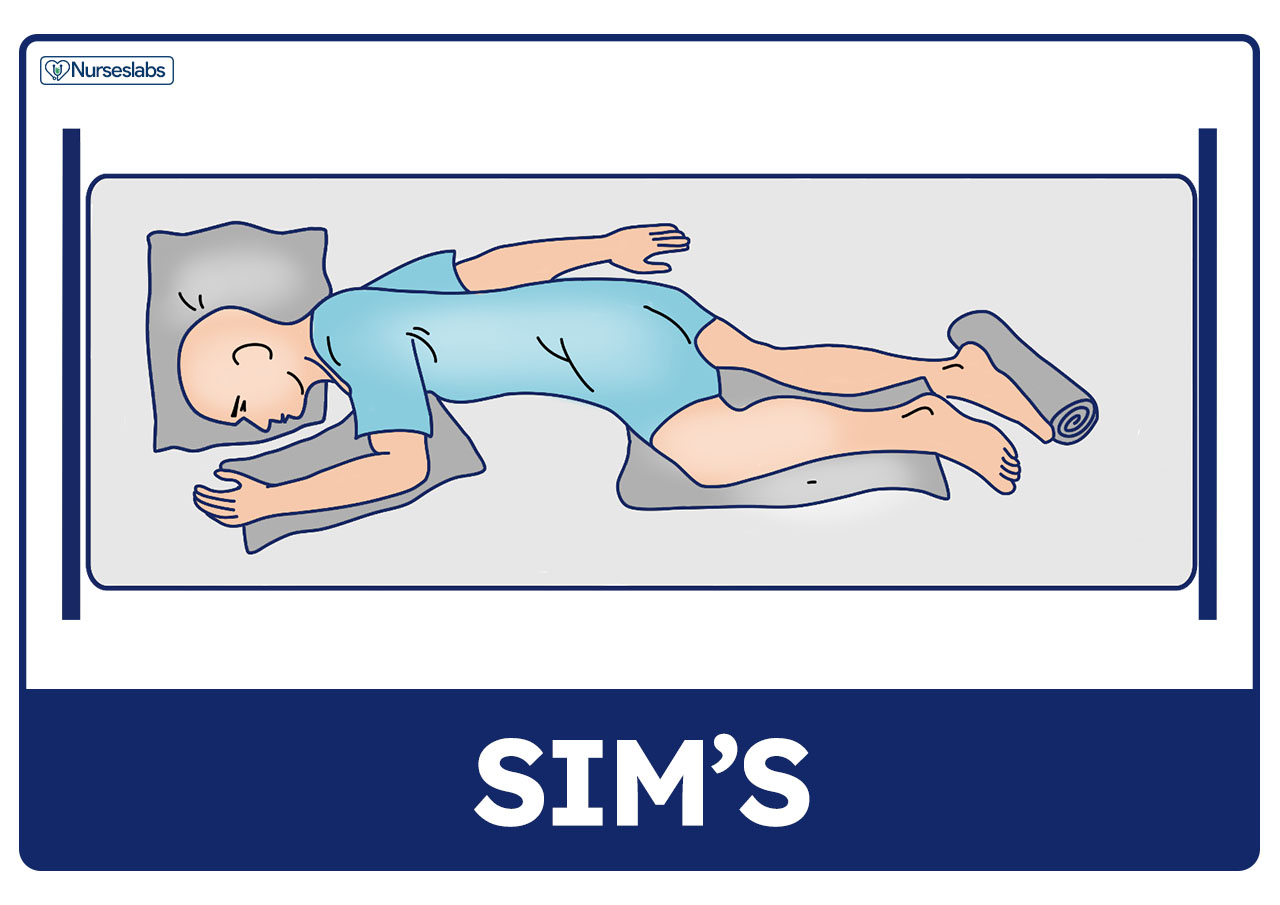
- Prevents aspiration of fluids. Sims’ may be used for unconscious clients because it facilitates drainage from the mouth and prevents aspiration of fluids.
- Reduces lower body pressure. It is also used for paralyzed clients because it reduces pressure over the sacrum and greater trochanter of the hip.
- Perineal area visualization and treatment. It is often used for clients receiving enemas and occasionally for clients undergoing examinations or treatments of the perineal area.
- Pregnant women comfort. Pregnant women may find the Sims position comfortable for sleeping.
- Promote body alignment with pillows. Support proper body alignment in Sims’ position by placing a pillow underneath the patient’s head and under the upper arm to prevent internal rotation. Place another pillow between the legs.
Lithotomy Position
Lithotomy is a patient position in which the patient is on their back with hips and knees flexed and thighs apart.
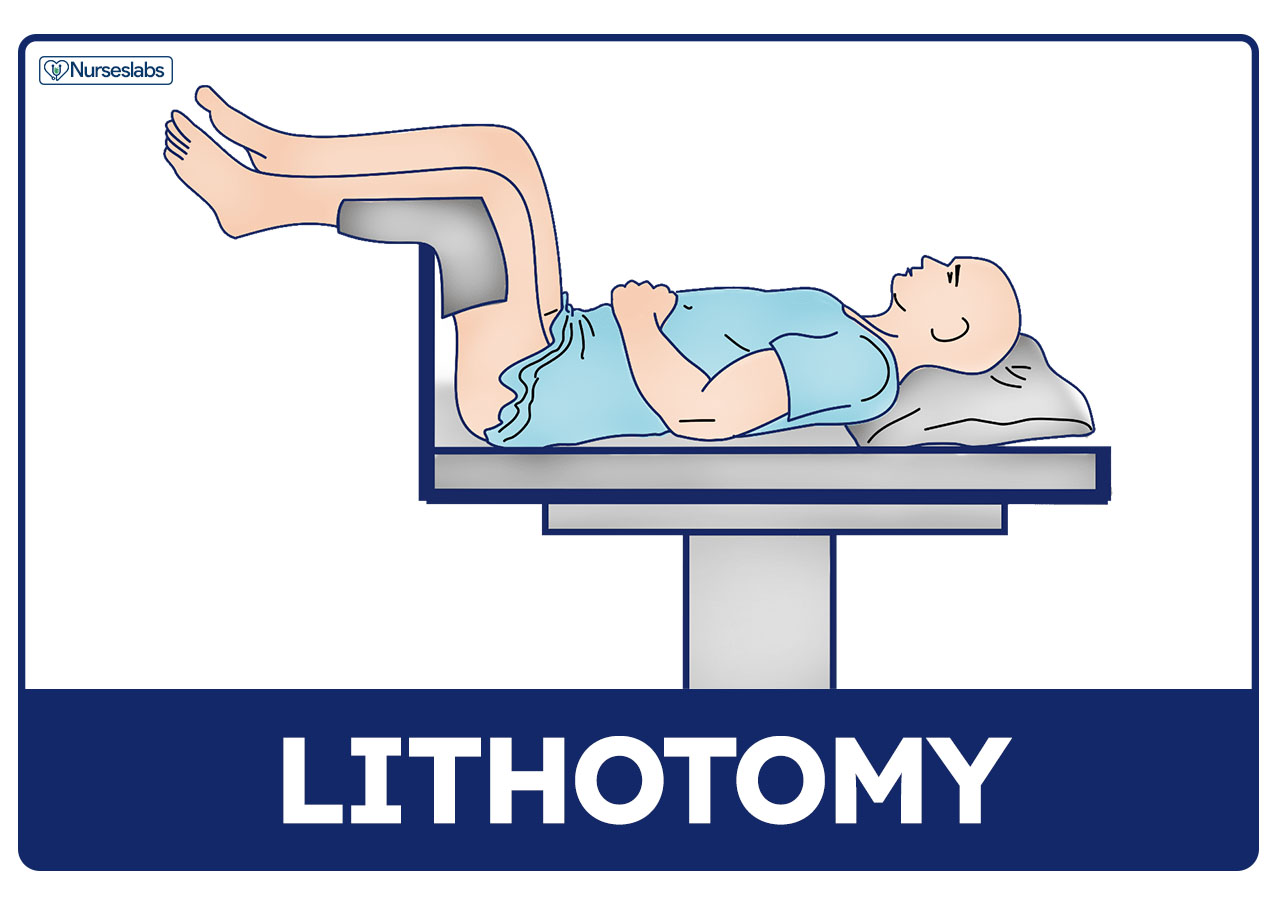
- Lithotomy position is commonly used for vaginal examinations and childbirth.
- Modifications of the lithotomy position include low, standard, high, hemi, and exaggerated based on how high the lower body is raised or elevated for the procedure. Please check with your facility’s guidelines but typically:
- Low Lithotomy Position: The patient’s hips are flexed until the angle between the posterior surface of the patient’s thighs, and the O.R. bed surface is 40 degrees to 60 degrees. The patient’s lower legs are parallel with the O.R. bed.
- Standard Lithotomy Position: The patient’s hips are flexed until the angle between the posterior surface of the patient’s thighs, and the O.R. bed surface is 80 degrees to 100 degrees. The patient’s lower legs are parallel with the O.R. bed.
- Hemilithotomy Position: The patient’s non-operative leg is positioned in standard lithotomy. The patient’s operative leg may be placed in traction.
- High Lithotomy Position: The patient’s hips are flexed until the angle between the posterior surface of the patient’s thighs, and the O.R. bed surface is 110 degrees to 120 degrees. The patient’s lower legs are flexed.
- Exaggerated Lithotomy Position: The patient’s hips are flexed until the angle between the posterior surface of the patient’s thighs, and the O.R. bed surface is 130 degrees to 150 degrees. The patient’s lower legs are almost vertical.
Trendelenburg’s Position
Trendelenburg’s position involves lowering the head of the bed and raising the foot of the bed of the patient. The patient’s arms should be tucked at their sides
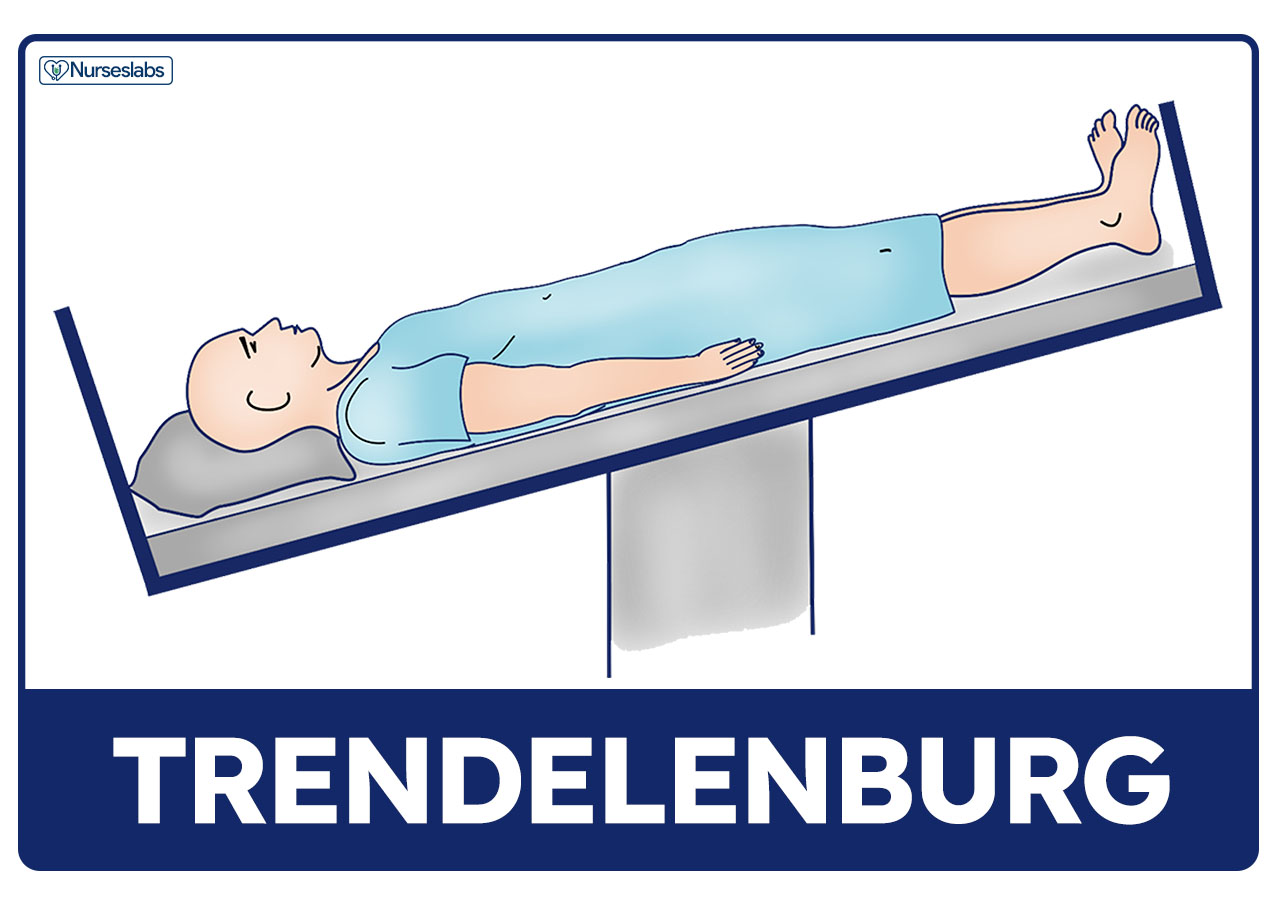
- Promotes venous return. Hypotensive patients can benefit from this position because it promotes venous return.
- Postural drainage. Trendelenburg’s position is used to provide postural drainage of the basal lung lobes. Watch out for dyspnea, some patients may require only a moderate tilt or a shorter time in this position during postural drainage. Adjust as tolerated.
Reverse Trendelenburg’s Position
Reverse Trendelenburg’s is a patient position wherein the head of the bed is elevated with the foot of the bed down. It is the opposite of Trendelenburg’s position.

- Gastrointestinal problems. Reverse Trendelenburg is often used for patients with gastrointestinal problems as it helps minimize esophageal reflux.
- Prevent rapid change of position. Patients with decreased cardiac output may not tolerate rapid movement or change from a supine to a more erect position. Watch out for rapid hypotension. It can be minimized by gradually changing the patient’s position.
- Prevent esophageal reflux. Promotes stomach emptying and prevents reflux for clients with hiatal hernia.
Knee-Chest Position
Knee-chest position can be in a lateral or prone position. In lateral knee-chest position, the patient lies on their side, the torso lies diagonally across the table, and the hips and knees are flexed. In prone knee-chest position, the patient kneels on the table and lowers their shoulders onto the table, so their chest and face rest on the table.
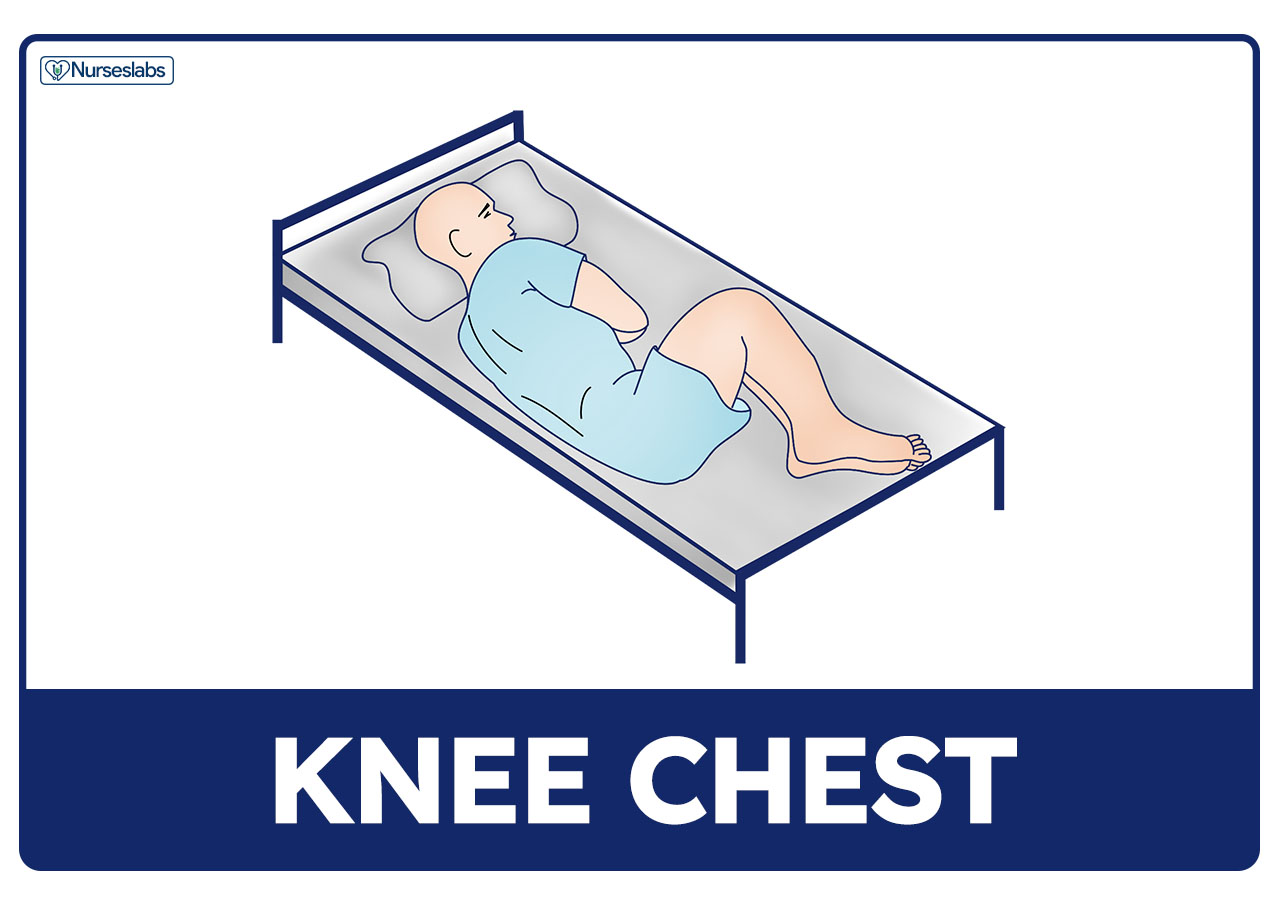
- Two ways. Knee-chest position can be lateral or prone.
- Sigmoidoscopy. Usual position adopted for sigmoidoscopy without anesthesia.
- Patient dignity. Prone knee-chest position can be embarrassing for some patients.
- Gynecologic and rectal examinations. Knee-chest position is assumed for a gynecologic or rectal examination.
Jackknife Position
Jackknife position, also known as Kraske, is wherein the patient’s abdomen lies flat on the bed. The bed is scissored, so the hip is lifted, and the legs and head are low.
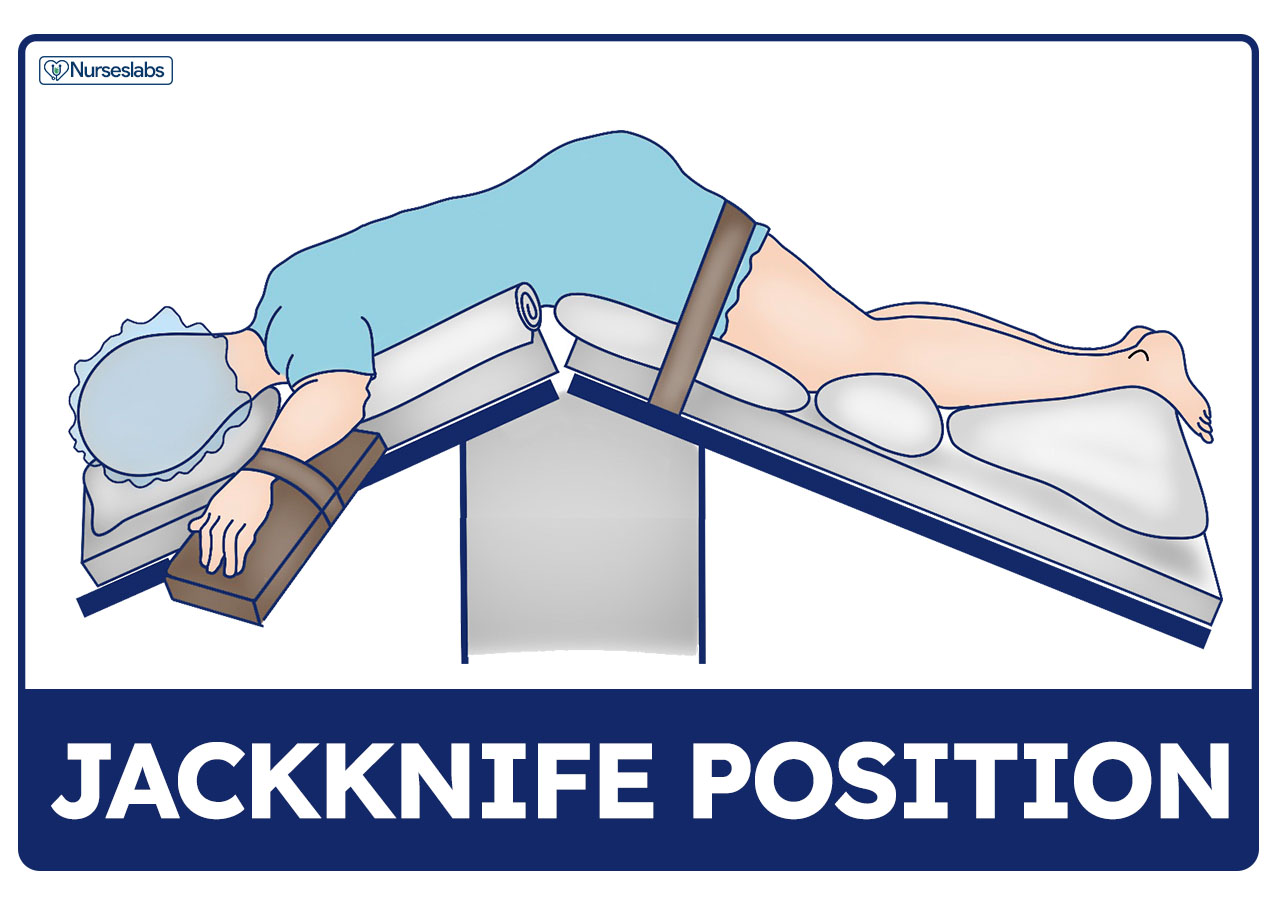
- In surgery. Jackknife position is frequently used for surgeries involving the anus, rectum, coccyx, certain back surgeries, and adrenal surgery.
- Requires team effort. At least four people are required to perform the transfer and position the patient on the operating table.
- Cardiovascular effects. In jackknife position, compression of the inferior vena cava from abdominal compression also occurs, which decreases venous return to the heart. This could increase the risk for deep vein thrombosis.
- Support paddings. Many pillows are required on the operating table to support the body and reduce pressure on the pelvis, back, and abdomen. The jackknife position also puts excessive pressure on the knees. While positioning, surgical staff should put extra padding for the knee area.
Kidney Position
In the kidney position, the patient assumes a modified lateral position wherein the abdomen is placed over a lift in the operating table that bends the body. The patient is turned on their contralateral side with their back placed on the edge of the table. The contralateral kidney is placed over the break in the table or over the kidney body elevator (if an attachment is available). The uppermost arm is placed in a gutter rest at no more than 90º abduction or flexion.
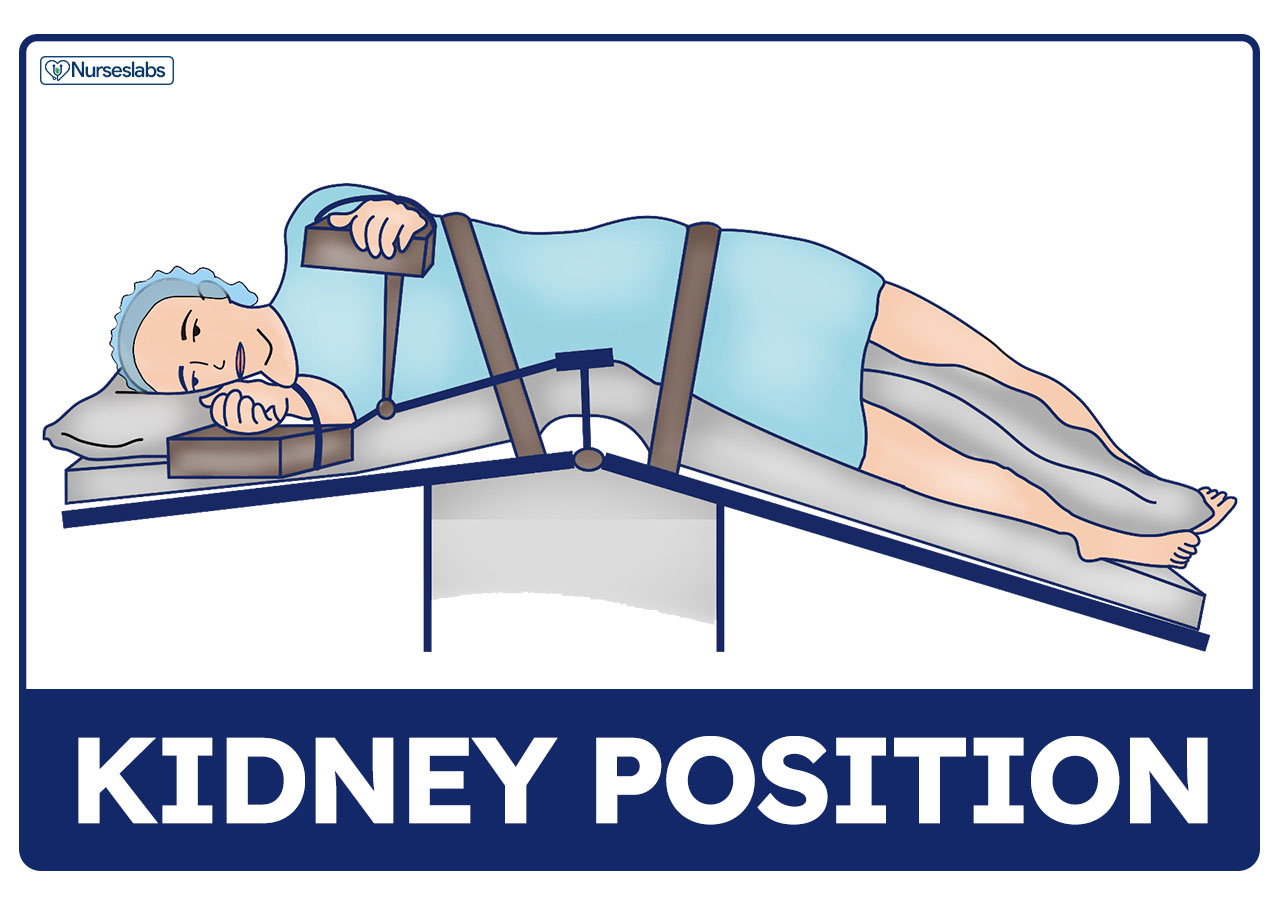
- Access to the retroperitoneal area. The kidney position allows access and visualization of the retroperitoneal area. A kidney rest or a small pillow is placed under the patient at the location of the lift.
- Risk for falls. The patient may fall off the table at any time until the position is secured.
- Padding and stabilization support. The contralateral arm underneath the body is protected with padding. The contralateral knee is flexed, and the uppermost leg is left straight to improve stability. A large soft pillow is placed in between the legs. A kidney strap and tape are placed over the hip to stabilize the patient.
Support Devices for Patient Positioning
The following are the devices or apparatus that can be used to help position the patient properly.
- Bed Boards. Bed boards are plywood boards placed under the mattress’s entire surface area and are useful for increasing back support and body alignment.
- Foot Boots. Foot boots are rigid plastic or heavy foam shoes that keep the foot flexed at the proper angle. It is recommended that they should be removed 2 to 3 times a day to assess the skin integrity and joint mobility.
- Hand Rolls. Hand rolls maintain the fingers in a slightly flexed and functional position and keep the thumb slightly adducted in opposition to the fingers.
- Hand-Wrist Splints. These splints are individually molded for the client to maintain proper alignment of the thumb in slight adduction and the wrist in slight dorsiflexion.
- Pillows. Pillows provide support, elevate body parts and splint incision areas, and reduce postoperative pain during activity, coughing, or deep breathing. They should be of the appropriate size for the body to be positioned.
- Sandbags. Sandbags are soft devices filled with substances that can be used to shape or contour the body’s shape and provide support. They immobilize extremities and maintain specific body alignment.
- Side Rails. Side rails are bars along the sides of the length of the bed. They ensure client safety and are useful for increased mobility. They also assist in rolling from side to side or sitting in bed. Check with your agency’s policies regarding the use of side rails as they vary from state to state.
- Trochanter Rolls. These rolls prevent the external rotation of the legs when the client is in the supine position. To form a roll, use a cotton bath blanket or a sheet folded lengthwise to a width extending from the greater trochanter of the femur to the lowest border of the popliteal space.
- Wedge Pillows. Are triangular pillows made of heavy foam and are used to maintain legs in abduction following total hip replacement surgery.
Documenting Patient Positioning
Documenting change of patient position in the patient’s chart. Note the following:
- Date and time of the procedure.
- Explanation of the procedure to the patient.
- Notation of the position the patient was placed in, including rationale.
- Pertinent teaching is given.
- Patient’s response to the procedure.
Cheat Sheet for Patient Positions
The section below is a nursing cheat sheet for different conditions or procedures and their appropriate patient position with rationale, including a downloadable copy of the different positions above.
Patient positioning cheat sheet


Patient positioning cheat sheet for different conditions and procedures
| Condition/Procedure | Patient Position | Rationale & Additional Info |
|---|---|---|
| Bronchoscopy | After: Semi-Fowler’s | To reduce aspiration risk from difficulty of swallowing |
| Cerebral angiography | During: Flat on bed with arms at sides; kept still.
After: Extremity in which contrast was injected is kept straight for 6 to 8 hours. Flat, if femoral artery was used. | Apply firm pressure on site for 15 minutes after the procedure. |
| Myelogram (air contrast) | Pre-op: surgical table will be moved to various positions during test. Post-op: Head of bed (HOB) is lower than trunk. | To disperse dye. |
| Myelogram (oil-based dye) | Pre-op: surgical table will be moved to various positions during test.
Post-op: Flat on bed for 6 to 8 hours | To disperse dye.To prevent CSF leakage. |
| Myelogram (water-based dye) | Pre-op: surgical table will be moved to various positions during test.
Post-op: HOB elevated for 8 hours. | To prevent dye from irritating the meninges. |
| Liver biopsy | During: Supine with RIGHT side of upper abdomen exposed; RIGHT arm raised and extended behind and and overhead and shoulder.
After: RIGHT side-lying with pillow under puncture site. | To expose the area.
To apply pressure and minimize bleeding. |
| Lung biopsy | Flat supine with arms raised above head and hands health together; head and arms on pillow. | To expose and provide easy access to the area. |
| Renal biopsy | PRONE with pillow under the abdomen and shoulders. | To expose the area. |
| Arteriovenous fistula | Post-op: Elevate extremity | Don’t sleep on affected side; encourage exercise by squeezing a rubber ball.
Don’t use AV arm for BP reading and venipuncture. |
| Peritoneal Dialysis | When outflow is inadequate: turn patient from side to side. | Turning facilitates drainage; check for kinks in the tubing.
Possible to have abdominal cramps and blood-tinged outflow if catheter was placed in the last 1-2 weeks. Cloudy outflow is never normal. |
| Meniere’s Disease | Change position slowly; bedrest during acute phase | Provide protection when ambulating |
| Autografting | Immobilize site for 3 to 7 days. | To promote healing and maximal adhesion. |
| Internal radiation, during treatment | Strict bedrest while implant is in place | To prevent dislodgement of the implant device.
Provide own urinal or bedpan to patient. |
| Heart failure with pulmonary edema | Sitting up, with legs dangling | To decrease venous return and reduce congestion; promotes ventilation and relieves dyspnea. |
| Myocardial infarction | Semi-Fowler’s | To help lessen chest pain and promote respiration. |
| Pericarditis | High-Fowlers, upright leaning forward. | To help lessen pain. |
| Peripheral artery disease | Depending on desired outcome.
Slight elevation of legs but not above the heart or slightly dependent. Dangle legs on side of the bed. | To slow or increase arterial return |
| Shock | Flat on bed. | To improve or increase circulation.
Trendelenburg is no longer a recommended position. |
| Sickle Cell Anemia | HOB elevated 30 degrees, avoid knee gatch and putting strain on painful joints | To promote maximum lung expansion and assist in breathing. |
| Varicose veins, leg ulcers, and venous insufficiency | Elevate extremities above heart level. | To prevent pooling of blood in the legs and facilitate venous return; avoid prolonged standing. |
| Deep vein thrombosis | Bed rest with affected limb elevated.
After 24 hours after heparin therapy, patient can ambulate if pain level permits. | To promote circulation. |
| Tracheoesophageal fistula (TEF) | HOB elevated 30-45 degrees. | To prevent reflux. |
| Ventriculoperitoneal shunt (for Hydrocephalus treatment) | After shunt placement: Place on non-operative side in flat position.
HOB raised 15-30 degrees if ICP is increased. Do not hold infant with head elevated. | Avoid rapid fluid drainage. |
| HyphemaBlood in anterior chamber of eye | HOB elevated 30-45 degrees, with night shield. | To allow the hyphema to settle out inferiorly and avoid obstruction of vision and to facilitate resolution |
| Abdominal aneurysm | Post-op: HOB no more than 45 degrees | To avoid flexion of the graft. |
| Dehiscence | Place in low-Fowler’s position then raise knees or instruct knees and support them with a pillow. | To decrease tension on the abdomen. |
| Dumping Syndrome, prevention of | Take meals in reclining position, lie down for 20-30 minutes after. | To delay gastric emptying time.
Restrict fluids during meals, low carb, low fiber diet in small frequent meals. |
| Evisceration | Place in low-Fowler’s position. | Instruct not to cough; place on NPO; keep intestines moist and covered with sterile saline until patient can be wheeled to OR. |
| Gastroesophageal reflux disease (GERD) | Reverse Trendelenburg, slanted bed with head higher.
Pediatric: prone with HOB elevated. | To promote gastric emptying and reduce reflux. |
| Hiatal hernia | Upright position after meals. | To prevent gastric content reflux. |
| Pyloric stenosis | RIGHT side-lying position after meals. | To facilitate entry of stomach contents into the intestines. |
| Extremity burns | Elevate extremity. | To reduce dependent edema and pressure. |
| Facial burns or trauma | Head elevated | To reduce edema |
| Autonomic dysreflexia | Initially place in sitting position or high Fowler’s position with legs dangling. | To reduce blood pressures below dangerous levels and provide partial symptom relief. |
| Cerebral aneurysm | HOB elevated 30-45 degrees; bed rest | To prevent pressure on aneurysm site |
| Heat stroke | Supine, flat with legs elevated. | To promote venous return and maintain blood flow to the head. |
| Hemorrhagic stroke | HOB elevated 30 degrees. | To reduce ICP and encourage blood drainage.Avoid hip and neck flexion which inhibits drainage. |
| Increased intracranial pressure (ICP) | Elevate HOB 30-45 degrees, maintain head midline and in neutral position. | To promote venous drainage.
Avoid flexion of the neck, head rotation, hip flexion, coughing, sneezing and bending forward. |
| Ischemic stroke | HOB flat in midline, neutral position. | To facilitate venous drainage and encourage arterial blood flow.
Avoid hip and neck flexion which inhibits drainage |
| Seizure | Side-lying or recovery position. | To drain secretions and prevent aspiration. |
| Spinal cord injury | Immobilize on spinal backboard, head in neutral position and immobilized with a firm, padded cervical collar.
Must be log rolled without allowing any twisting or bending movements | To prevent any movement and further injury. |
| Head injury | Elevate HOB 30 degrees, head should be kept in neutral position. | To decrease intracranial pressure (ICP).Keep head from flexing or rotating.
Avoid frequent suctioning. |
| Buck’s Traction | Elevate FOB for counter-traction; use trapeze for moving; place pillow beneath lower legs. | Ask patient to dorsiflex foot of the affected leg to assess function of peroneal nerve, weakness may indicate pressure on the nerve. |
| Casted arm | Elevate at or above level of heart | To minimize swelling |
| Delayed prosthesis fitting | Elevate foot of bed to elevate residual limb. | To hasten venous return and prevent edema. |
| Hip fracture | Affected extremity needs to be abducted. | Use splints, wedge pillow, or pillows between legs.
Avoid stooping, flexion position during sex, and overexertion during walking or exercise. |
| Hip replacement | On unaffected side: maintain abduction when in supine position with pillow between legs.
HOB raised to 30-45 degrees. | Avoid extreme internal or external rotation. |
| Immediate prosthesis fitting | Elevate residual limb for 24 hours. | Rigid cast acts to control swelling. |
| Osteomyelitis | Support affected extremity with pillows or splints | To maintain proper body alignment; avoid strenuous exercises. |
| Total hip replacement | Help to sitting position; place chair at 90 degrees angle to bed; stand on affected side; pivot patient to unaffected side. | To prevent dizziness and orthostatic hypotension. |
| Acute Respiratory Distress Syndrome (ARDS) | High Fowler’s | To promote oxygenation via maximum chest expansion. |
| Air embolism from dislodged central venous line | Turn to LEFT side or place in Trendelenburg. | Patient should be immediately repositioned with the right atrium above the gas entry site so that trapped air will not move into the pulmonary circulation. |
| Asthma | High Fowler’s
Tripod position: sitting position while leaning forward with hands on knees. | To promote oxygenation via maximum chest expansion. |
| Chronic Obstructive Pulmonary Disease (COPD) | High Fowler’s
Orthopneic position | To promote maximum lung expansion and assist in breathing. |
| Emphysema | High Fowler’s
Orthopneic position | To promote maximum lung expansion |
| Pleural Effusion | High Fowler’s | To provide maximal |
| Pneumonia | High Fowler’s
Lay on affected side Lay with affected lung up | To maximize breathing mechanisms.
To splint and reduce pain. To reduce congestion. |
| Pneumothorax | High Fowler’s | To promote maximum lung expansion and assist in breathing. |
| Pulmonary edema | High Fowler’s, legs dependent position | To decrease edema and congestion |
| Pulmonary embolism | High Fowler’s
Turn patient to LEFT side and lower HOB | To promote maximum lung expansion and assist in breathing. |
| Flail chest | High Fowler’s | To provide maximal comfort and maximize breathing mechanisms. |
| Rib fracture | High Fowler’s | To promote maximum lung expansion and assist in breathing. |
| Contraction stress test (CST) | Placed in semi-Fowler’s or side-lying position | Monitor for post-test labor onset. |
| Cord prolapse | Shrimp or fetal position; modified Sims’ or Trendelenburg. | To prevent pressure on the cord. If cord prolapses, cover with sterile saline gauze to prevent drying. |
| Fetal distress | Turn mother to her LEFT side. | To reduce compression of the vena cava and aorta. |
| Late decelerations (placental insufficiency) | Turn mother to her LEFT side. | To allow more blood flow to the placenta. |
| Placenta previa | Sitting position. | To minimize bleeding. |
| Variable decelerations (cord compression) | Place mother in Trendelenburg position. | To remove pressure off the presenting part of the cord and prevent gravity from pulling the fetus out of the body. |
| Spina Bifida | Prone (on abdomen). | To prevent sac rupture. |
| Cleft lip (congenital) | Position on back or in infant seat.
Hold in upright position while feeding. | To prevent trauma to suture line. |
| Prolapsed umbilical cord | During labor: Knee-chest position or Trendelenburg. | Relieves pressure or gravity from pulling the cord.
Hand in vagina to hold presenting part of fetus off cord. |
| Cardiac catheterization (post) | HOB elevated no more than 30 degrees or flat as prescribed.May turn to either side | Affected extremity should be kept straight. |
| Continuous Bladder Irrigation (CBI) | Tape catheter to thigh; no other positioning restrictions | Prevents the catheter from being dislodged. |
| Ear drops | Position affected ear uppermost then lie on unaffected ear for absorption. | Pull outer ear upward and back for adults; upward and down for children. |
| Ear irrigation | During procedure: Tilt head towards affected ear.
After procedure: Lie on affected side for drainage. | Better visualization and drainage of the medium to the ear canal via gravity. |
| Eye drops | Tilt head back and look up, pull lid down. | Drop to center of the lower conjunctival sac; blink between drops; press inner canthus near nose bridge for 1-2 min to prevent systemic absorption. |
| Lumbar puncture | During: Shrimp or fetal position (side-lying with back bowed, knees drawn up to abdomen, neck flexed to rest chin on chest).
After: Flat on bed for 4-12 hours. | To maximize spine flexion.
To prevent spinal headache and CSF leakage. |
| Nasogastric tube insertion | High Fowler’s with head tilted forward | Closes the trachea and opens the esophagus; prevents aspiration. |
| Nasogastric tube irrigation and tube feedings | HOB elevated 30 to 45 degrees; keep elevated for 1 hour after an intermittent feeding.
With decreased LOC: RIGHT side-lying with HOB elevated. With tracheostomy: Maintain in semi-Fowler’s position | To prevent aspiration.Promotes emptying of the stomach and prevents aspiration.
To prevent aspiration. |
| Paracentesis | During: Semi-Fowler’s in bed or sitting upright on side of bed with chair; support the feet.
Post: Assist into any comfortable position | Empty the bladder before procedure; report elevated temperature; assess for hypovolemia. |
| Postural Drainage | Trendelenburg | Lung area needing drainage should be in uppermost position |
| Rectal enema administration | Left side-lying (Sims’ position) with right knee flexed. | Allows gravity to work into the direction of the colon by placing the descending colon at its lowest point. |
| Rectal enemas and irrigation | Left side-lying, Sims’ position | To allow fluid to flow in the natural direction of the colon. |
| Sengstaken-Blakemore and Minnesota tubes | HOB elevated | To enhance lung expansion and reduce portal blood flow, permitting esophagogastric balloon tamponade. |
| Thoracentesis | Before: (1) Sitting on edge of bed while leaning on bedside table with feet supported by stool; or lying in bed on unaffected side with head elevated 45 degrees.
(2) Lying in bed on unaffected side with HOB elevated to Fowler’s. After: Assist patient into any comfortable position preferred. | Prevent fluid leakage into the thoracic cavity. |
| Total Parenteral Nutrition (TPN) | During insertion: Trendelenburg. | To prevent air embolism. |
| Vascular extremity graft | Bed rest for 24 hours, keep extremity straight and avoid knee or hip flexion | For maximal adhesion. |
| Perineal procedures | Lithotomy | For better visualization of the area. |
| Appendectomy | Post-op: Fowler’s position | To relieve abdominal pain and ease breathing. |
| Cataract surgery | Sleep on unaffected side with a night shield for 1 to 4 weeks.
Semi-Fowler’s or Fowler’s on back or on non-operative side. | To prevent edema. |
| Craniotomy | HOB elevated 30-45% with head in a midline, neutral position.
Never put client on operative side, especially if bone was removed. | To facilitate venous drainage. |
| Hemorrhoidectomy | During: Prone Jackknife position. | Provides better visualization of the area. |
| Hypophysectomy Surgical removal of the pituitary gland. | HOB elevated. | To prevent increase in ICP. |
| Infratentorial surgery Incision at back of head, above nape of neck | Flat and lateral on either side; avoid neck flexing. | To facilitate drainage. |
| Kidney transplant | Post-op: Semi-Fowler’s, turn from back to non-operative side | To promote gas exchange |
| Laminectomy | Back is kept straight.Patient is logrolled if turned.
Sit straight in straight-backed chair when out of bed or when ambulating. | |
| Laryngectomy | HOB elevated 30-45 degrees | To maintain airway and decrease edema. |
| Mastectomy | Semi-Fowler’s with arm on affected side elevated. | To allow lymph drainage.
Turn only on back and on unaffected side. |
| Mitral valve replacement | Post-op: semi-Fowler’s position. | To assist in breathing. |
| Myringotomy | Post-op: Position on side of affected ear . | To allow drainage of secretions |
| Retinal detachment | Bed rest with minimal activity and repositioning.
Area of detachment should be in the dependent position. | Helps detached retina fall into place. |
| Supratentorial surgery Incision front of head below hairline | HOB elevated 30-45 degrees; maintain head/neckline in midline neutral position; avoid extreme hip and neck flexion. | To facilitate drainage. |
| Thyroidectomy | Post-op: High Fowler’s or semi-Fowler’s.
Avoid extension and movement by using sandbags or pillows. | To reduce swelling and edema in the neck area.
To decrease tension on the suture line and support the head and neck. |
| Tonsillectomy | Post-op: prone or side-lying | To facilitate drainage and relieve pressure on the neck. |
| Bone marrow aspiration/biopsy | Side lying with head tucked and legs pulled up or;
Prone with arms folded under chin. | To expose the area.
Apply pressure to the area after the procedure to stop the bleeding. |
| Amputation: above the knee | Elevate for first 24 hours using pillow.Position prone twice daily. | To prevent edema.
To provide for hip extension and stretching of flexor muscles; prevent contractures, abduction |
| Amputation: below the knee | Foot of bed elevated for first 24 hours.
Position prone daily. | To prevent edema.
To provide for hip extension. |
Frequently Asked Questions
1. What is patient positioning in nursing?
Patient positioning in nursing refers to placing a patient in specific postures that maintain proper body alignment, support airway and circulation, prevent pressure injuries, and provide optimal access for examinations, treatments, or surgery.
2. What are the goals of proper patient positioning?
The goals include ensuring patient comfort and safety, protecting the airway and circulation, preventing complications of immobility, respecting dignity and privacy, and providing healthcare professionals with maximum visibility and access to treatment areas.
3. What are the most common patient positions used in nursing care?
The most common positions are supine (dorsal recumbent), Fowler’s (low, semi, or high), prone, lateral (side-lying), Sims’, lithotomy, and Trendelenburg. Each position serves specific purposes such as improving breathing, providing surgical access, or reducing pressure on certain body parts.
4. How often should patients be repositioned to prevent complications?
Bed-bound patients should generally be repositioned at least every two hours. Regular turning helps prevent pressure ulcers, nerve damage, respiratory issues, and promotes better circulation.
5. What are the nursing considerations and safety guidelines for patient positioning?
Nurses should explain the procedure, encourage patient participation, use proper body mechanics, and apply support devices like pillows or wedges. Safety involves preventing friction and shear, padding bony prominences, and monitoring the patient’s response to each position.
References and Sources
The following are the references and sources for this patient positioning study guide:
- Beckett, A. E. (2010). Are we doing enough to prevent patient injury caused by positioning for surgery?. Journal of perioperative practice, 20(1), 26-29.
- Berman, A., Snyder, S. J., Levett-Jones, T., Dwyer, T., Hales, M., Harvey, N., … & Stanley, D. (2018). Kozier and Erb’s Fundamentals of Nursing [4th Australian edition].
- Miranda, A. B., Fogaça, A. R., Rizzetto, M., & Lopes, L. C. C. (2016). Surgical positioning: nursing care in the transoperative period. Rev SOBECC, 21(1), 52-8. [Link]
- Ritchie, I. K. (2003). Positioning Patients for SurgeryBy Chris Servant & Shaun Purkiss Greenwich Medical Media ISBN 1841100528£ 22.50.
- Rosdahl, C. B., & Kowalski, M. T. (Eds.). (2008). Textbook of basic nursing. Lippincott Williams & Wilkins.
- Park, C. K. (2000). The effect of patient positioning on intraabdominal pressure and blood loss in spinal surgery. Anesthesia & Analgesia, 91(3), 552-557.
- Price, P., Frey, K. B., & Junge, T. L. (2004). Surgical technology for the surgical technologist: A positive care approach. Taylor & Francis.


Leave a Comment